To build multilingual Android apps we need to put bit effort in translating the content of the App and putting them in the appropriate folders.
While localizing, you should consider using appropriate text, audio, currency, numbers and graphics depending upon the region or country. But this tutorial only covers localizing strings i.e supporting multiple languages. Localizing with Resources explains about other things should be considered when localizing your app.


3. Android Localization Language ISO Codes
Below table give you ISO languages codes for all the languages that android supports.
While localizing, you should consider using appropriate text, audio, currency, numbers and graphics depending upon the region or country. But this tutorial only covers localizing strings i.e supporting multiple languages. Localizing with Resources explains about other things should be considered when localizing your app.
1. How String Localization Works
By default android considers English as primary language and loads the string resources from res ⇒ values ⇒ strings.xml. When you want to add support for another language, you need to create a values folder by appending an Hyphen and the ISO language code. For example if you want to add support for French, you should create a values folder named values-fr and keep a strings.xml file in it with all the strings translated into French language.
In brief the localization works as follows
1. When user changes the device language through Settings ⇒ Language & Input, android OS itself checks for appropriate language resources in the app. (Let’s say user is selecting French)
2. If the app supports selected language, android looks for it’s string resources in values-(ISO language Code) folder in the project. (For french it loads the string values from values-fr/string.xml)
3. If the supported language strings.xml misses any string value, android always loads the missing strings from default strings.xml file i.e values/strings.xml
So it is mandatory that the default stings.xml file should contains all the string values that app uses. Other wise the app will crash with Force Close error.
2. Check the Sample for Localization
This sample will explain you by displaying "Hello World" in different languages when changing the language in setting menu(Tool Bar menu)
Create a new project and follow the coding
Open strings.xml located under values folder and add following strings. These are default English language strings.
<?xml version="1.0" encoding="utf-8"?><resources>
    <string name="app_name">Localizing Sample</string>
    <string name="hello">Hello World</string>
</resources>
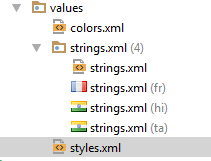
Now under res folder create three folders named values-ta, values-fr, values-hi and a strings.xml file in each of the folders.
Your project should look like this once you created the required files/folders.
Now translate the strings into respected languages and place them in appropriate strings.xml files.
Tamil values-ta/strings.xml
<?xml version="1.0" encoding="utf-8"?>
<resources>
<string name="app_name">மாதிரியான மாதிரி</string>
<string name="hello">ஹலோ உலகம்</string>
</resources>
<resources>
<string name="app_name">மாதிரியான மாதிரி</string>
<string name="hello">ஹலோ உலகம்</string>
</resources>
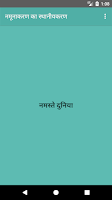
Hindi values-hi/strings.xml
<?xml version="1.0" encoding="utf-8"?>
<resources>
<string name="app_name">नमूनाकरण का स्थानीयकरण</string>
<string name="hello">नमस्ते दुनिया</string>
</resources>
<resources>
<string name="app_name">नमूनाकरण का स्थानीयकरण</string>
<string name="hello">नमस्ते दुनिया</string>
</resources>
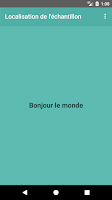
French values-fr/strings.xml
<?xml version="1.0" encoding="utf-8"?>
<resources>
<string name="app_name">Localisation de l\'échantillon</string>
<string name="hello">Bonjour le monde</string>
</resources>
<resources>
<string name="app_name">Localisation de l\'échantillon</string>
<string name="hello">Bonjour le monde</string>
</resources>
Open your main activity layout file (in my case activity_main.xml) and add the following content to create a simple layout. This layout contains a textview at center of a screen
activity_main.xml
<?xml version="1.0" encoding="utf-8"?>
<android.support.constraint.ConstraintLayout xmlns:android="http://schemas.android.com/apk/res/android"
    xmlns:app="http://schemas.android.com/apk/res-auto"
    xmlns:tools="http://schemas.android.com/tools"
    android:layout_width="match_parent"
    android:layout_height="match_parent"
    android:background="@color/colorPrimary"
    tools:context="com.mrbrown.locale_sample.MainActivity">

    <TextView
        android:id="@+id/idText"
        android:layout_width="wrap_content"
        android:layout_height="wrap_content"
        android:text="Hello World!"
        android:textStyle="bold"
        android:textColor="@color/colorPrimaryDark"
        android:textAppearance="@style/Base.TextAppearance.AppCompat.Large"
        app:layout_constraintBottom_toBottomOf="parent"
        app:layout_constraintLeft_toLeftOf="parent"
        app:layout_constraintRight_toRightOf="parent"
        app:layout_constraintTop_toTopOf="parent" />

</android.support.constraint.ConstraintLayout>
Open your MainActivity.java and make sure that it has following code. This code will be added automatically when you create new project.
public class MainActivity extends AppCompatActivity {

    public static String languageToLoad = "en";
    public static SharedPreferences sharePrefs;
    SharedPreferences.Editor sharePref_Editor;
    private TextView txtView;

    @Override
    protected void onCreate(Bundle savedInstanceState) {
        super.onCreate(savedInstanceState);
        setContentView(R.layout.activity_main);

        sharePrefs = PreferenceManager
                .getDefaultSharedPreferences(MainActivity.this);
        txtView = (TextView) findViewById(R.id.idText);

        if (sharePrefs.getString("language", "").equalsIgnoreCase("hi")) {
            String languageToLoad = "hi"; // your language
            Locale locale = new Locale(languageToLoad);
            Locale.setDefault(locale);
            Configuration config = new Configuration();
            config.locale = locale;
            getBaseContext().getResources().updateConfiguration(config,
                    getBaseContext().getResources().getDisplayMetrics());
            setTitle(getResources().getString(R.string.app_name));
            txtView.setText(getResources().getString(R.string.hello));

        } else if (sharePrefs.getString("language", "").equalsIgnoreCase("en")){
            String languageToLoad = "en";
            Locale locale = new Locale(languageToLoad);
            Locale.setDefault(locale);
            Configuration config = new Configuration();
            config.locale = locale;
            getBaseContext().getResources().updateConfiguration(config,
                    getBaseContext().getResources().getDisplayMetrics());
            setTitle(getResources().getString(R.string.app_name));
            txtView.setText(getResources().getString(R.string.hello));
        }else if (sharePrefs.getString("language", "").equalsIgnoreCase("fr")){
            String languageToLoad = "fr";
            Locale locale = new Locale(languageToLoad);
            Locale.setDefault(locale);
            Configuration config = new Configuration();
            config.locale = locale;
            getBaseContext().getResources().updateConfiguration(config,
                    getBaseContext().getResources().getDisplayMetrics());
            setTitle(getResources().getString(R.string.app_name));
            txtView.setText(getResources().getString(R.string.hello));
        }else {
            String languageToLoad = "ta";
            Locale locale = new Locale(languageToLoad);
            Locale.setDefault(locale);
            Configuration config = new Configuration();
            config.locale = locale;
            getBaseContext().getResources().updateConfiguration(config,
                    getBaseContext().getResources().getDisplayMetrics());
            setTitle(getResources().getString(R.string.app_name));
            txtView.setText(getResources().getString(R.string.hello));
        }
    }

    @Override
    public boolean onCreateOptionsMenu(Menu menu) {
        getMenuInflater().inflate(R.menu.lang_setting_menu, menu);
        return super.onCreateOptionsMenu(menu);
    }

    @Override
    public boolean onOptionsItemSelected(MenuItem item) {
        switch (item.getItemId()) {
            case R.id.eng:
                languageToLoad = "en"; // English
                Locale locale = new Locale(languageToLoad);
                Locale.setDefault(locale);
                Configuration config = new Configuration();
                config.locale = locale;
                getBaseContext().getResources().updateConfiguration(config,
                        getBaseContext().getResources().getDisplayMetrics());
                sharePref_Editor = sharePrefs.edit();
                sharePref_Editor.putString("language", "en");
                sharePref_Editor.commit();
                Intent intHome1 = new Intent(MainActivity.this, MainActivity.class);
                startActivity(intHome1);
                finish();
                overridePendingTransition(R.anim.bottomin, R.anim.leftout);
                break;
            case R.id.hn:
                languageToLoad = "hi"; // Hindi
                locale = new Locale(languageToLoad);
                Locale.setDefault(locale);
                config = new Configuration();
                config.locale = locale;
                getBaseContext().getResources().updateConfiguration(config,
                        getBaseContext().getResources().getDisplayMetrics());
                sharePref_Editor = sharePrefs.edit();
                sharePref_Editor.putString("language", "hi");
                sharePref_Editor.commit();
                Intent intHome = new Intent(MainActivity.this, MainActivity.class);
                startActivity(intHome);
                finish();
                overridePendingTransition(R.anim.bottomin, R.anim.leftout);
                break;

            case R.id.fr:
                languageToLoad = "fr"; // French
                locale = new Locale(languageToLoad);
                Locale.setDefault(locale);
                config = new Configuration();
                config.locale = locale;
                getBaseContext().getResources().updateConfiguration(config,
                        getBaseContext().getResources().getDisplayMetrics());
                sharePref_Editor = sharePrefs.edit();
                sharePref_Editor.putString("language", "fr");
                sharePref_Editor.commit();
                Intent intHome2 = new Intent(MainActivity.this, MainActivity.class);
                startActivity(intHome2);
                finish();
                overridePendingTransition(R.anim.bottomin, R.anim.leftout);
                break;

            case R.id.ta:
                languageToLoad = "ta"; // Tamil
                locale = new Locale(languageToLoad);
                Locale.setDefault(locale);
                config = new Configuration();
                config.locale = locale;
                getBaseContext().getResources().updateConfiguration(config,
                        getBaseContext().getResources().getDisplayMetrics());
                sharePref_Editor = sharePrefs.edit();
                sharePref_Editor.putString("language", "ta");
                sharePref_Editor.commit();
                Intent intHome3 = new Intent(MainActivity.this, MainActivity.class);
                startActivity(intHome3);
                finish();
                overridePendingTransition(R.anim.bottomin, R.anim.leftout);
                break;

            default:
                break;
        }
        return super.onOptionsItemSelected(item);
    }
}
Now if you run the project you should see the app in English (assuming that your device is set to English language)

In order to see the app in other languages follow below steps
Click the option menu in tool bar and select a language

Screen of corresponding selected language will be like


3. Android Localization Language ISO Codes
Below table give you ISO languages codes for all the languages that android supports.
| Language | Locale | values/strings.xml |
| German | de | values-de/strings.xml |
| Chinese | zh | values-zh/strings.xml |
| Czech | cs | values-cs/strings.xml |
| Dutch | nl | values-nl/strings.xml |
| French | fr | values-fr/strings.xml |
| Italian | it | values-it/strings.xml |
| Japanese | ja | values-ja/strings.xml |
| Korean | ko | values-ko/strings.xml |
| Polish | pl | values-pl/strings.xml |
| Russian | ru | values-ru/strings.xml |
| Spanish | es | values-es/strings.xml |
| Arabic | ar | values-ar/strings.xml |
| Bulgarian | bg | values-bg/strings.xml |
| Catalan | ca | values-ca/strings.xml |
| Croatian | hr | values-hr/strings.xml |
| Danish | da | values-da/strings.xml |
| Finnish | fi | values-fi/strings.xml |
| Greek | el | values-el/strings.xml |
| Hebrew | iw | values-iw/strings.xml |
| Hindi | hi | values-hi/strings.xml |
| Hungarian | hu | values-hu/strings.xml |
| Indonesian | in | values-in/strings.xml |
| Latvian | lv | values-lv/strings.xml |
| Lithuanian | lt | values-lt/strings.xml |
| Norwegian | nb | values-nb/strings.xml |
| Portuguese | pt | values-pt/strings.xml |
| Romanian | ro | values-ro/strings.xml |
| Serbian | sr | values-sr/strings.xml |
| Slovak | sk | values-sk/strings.xml |
| Slovenian | sl | values-sl/strings.xml |
| Swedish | sv | values-sv/strings.xml |
| Tagalog | tl | values-tl/strings.xml |
| Thai | th | values-th/strings.xml |
| Turkish | tr | values-tr/strings.xml |
| Ukrainian | uk | values-uk/strings.xml |
| Vietnamese | vi | values-vi/strings.xml |
4. Translation Services
Right now I used Google Translate service to translate the strings into other languages. But if you want more accurate and meaningful translation always go for professional services like Professional translations through Google Play
Finally Localization Checklist gives you list of things to be verified before the app goes live when localization considered.
________________________________________________________________________
SourceCode Localization_Sample.zip
Happy Coding...
Comments
Post a Comment