Have you heard about Ionic Framework? It is the most popular
framework for building hybrid mobile applications. This post is a introductory
post about the Ionic Framework Tutorial I will be posting here. In this post we
will learn about the environment setup for Ionic Framework. And we will also
deploy a very simple Hello World application. So lets start.
Prerequisites
Though you can easily build Hybrid Applications but we will
be discussing about Android here. To develop hybrid application don’t worry
about java. Because you need the knowledge of HTML, CSS and JavaScript for
building Mobile apps with Ionic Framework.
What is Ionic Framework?
Ionic is a front end HTML Framework. It is build on
AngularJS and Cordova. If you are a web developer then you can easily start
building Mobile Applications using Ionic Framework as it uses the web
technologies like HTML, CSS, JavaScript. etc.
Ionic Framework Tutorial
So the first thing we need to get started with Ionic
Framework is itself the Ionic Framework.
Installing Ionic is very easy but before you install Ionic you need to.
Installing Ionic is very easy but before you install Ionic you need to.
Installation

Install Android SDK
If you
already have Android Studio and SDK installed in your computer then you can
skip this step. You can get the Android SDK from this link.
Install Node JS
Install Ionic Framework
To
install Ionic framework open command prompt in windows as administrator.
Now run
the following command.
sudo npm install -g cordova
ionic
When you execute this command Ionic Framework will be
installed after few minutes depending on your internet speed.
Starting an Ionic Application
Now we have done with the installation and we can start
developing mobile applications. So let’s create a blank Ionic Application.
Creating a Blank Application
To create a blank application we can use the following
command.
ionic
start your-apps-name blank
So
I will run the following command to create a blank application.
ionic start myfirsthybrid blank
Now
we need to navigate inside the apps directory and we can do it using the cd
command.
cd myfirsthybrid


That's all about setup the environment for the development of hybrid mobile application using ionic framework. Will see some functionality on this platform on upcoming uploads.
cd myfirsthybrid
Adding a Platform
As we will be learning developing android
application so I will add android platform on the created project. To add
android platform just type the following command and hit enter.
ionic platform add android
You can also write ios instead of android if you want to
build for ios.
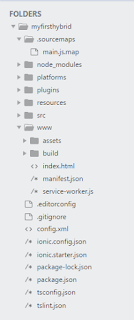
Understanding Directory Structure
Open the project folder. It will look like this.

For a better view you can open the folder with a text
editor. I am using Sublime text editor for this.

Now let’s discuss the
directories and files.
- hooks
This directory contain scripts used for Cordova commands. Don’t worry much about this as we will not be using this for now. - platforms
We will also not be using this folder. This folder contains the Android and iOS platforms. - plugins
Here Cordova plugins are installed. Every time the project is created some plugins are installed. We can add more plugins that are available. We will learn adding plugins later. - resources
The folder contains resources like icon start screens etc. - scss
This folder contains the sass files. We can also use CSS for styling. - www
This is the main folder for coding the application. www is the default name but it can be changed if needed. You will find some more folders inside this folder. So let’s see what are these.
- css for
storing our style sheet that will be used for styling the application.
- img for
storing the images used in the app.
- js contains
apps main configuration file (app.js) and AngularJS components
(controllers, services, directives). And also all the javascript
that we will be writing while development will be stored here.
- libs to
store libraries, it is also clear from the name.
- templates will
keep our html files for the application.
- index.html is
the starting view of the app.
- Other Files
- .bowerrc is
bower configuration file.
- .editorconfig is
editor configuration file.
- .gitignore when
we push the app to githup repository this file used to instruct which
part is to ignore from the app. For example we don’t share api keys used.
- bower.json will
contain bower components.
- gulpfile.js is
used for creating automated tasks
- config.xml is
Cordova configuration file.
- package.json contains
all the information about the application, dependencies and plugins.
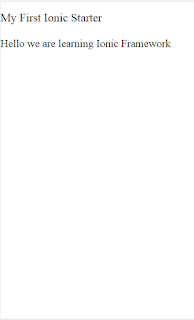
Customizing the First Screen
So you know now that index.html inside
www is the starting point of the application. So open it and I am writing
a simple h2 here. Just remember all the content is added
inside <ion-content> </ion-content> tag.

Running The
Application
We have two ways to
run or debug the application.
In Emulator
The first one is in
the emulator. So if you have an Android Emulator already installed just run the
following command to start the app.
ionic run android
In browser
You can also test the application in browser. To run it in
browser executes the following command.
ionic serve
And your app will be launched in your default browser. You
can also use the toggle device option from the console to debug it in mobile
view.
Output is as in an image below,

Happy Coding...
Comments
Post a Comment